Deliver Incident Information Faster with the Zendesk Alerts Packaged Workflow
Categories
Incident Management
With increased dependencies on digital services, it can feel like there’s always another incident or support issue taking you away from what you actually want to do – which is of course to build cool new features that delight your customers! We’re always working to make it easier to resolve issues quickly so you can get back to the fun stuff, and our packaged workflows are a great way to get started. In this article, I’ll be focusing on the Zendesk Alerts packaged workflow.
Workflow templates, including packaged workflows, are available for download, along with detailed configuration and setup instructions.
With xMatters and Zendesk Alerts workflow, you can get the right person’s eyes on the issue faster, delivering key incident information to them rather than them having to find it. But getting the job done often needs more than one set of eyes and multiple tools.
To give you an idea how packaged workflows can make your life easier, I’m going to take you through our xMatters Zendesk Alerts Packaged Workflow. Don’t worry, you don’t need to be a Zendesk user to get the gist of what packaged workflows can do for your sanity. As you’ll see, the beauty of packaged workflows is that they give you a template you can review and build on so you’re not starting at zero. You get useful baseline functionality that’s flexible and extensible.
With packaged workflows and Flow Designer, you can automate and orchestrate key resolution processes, which reduces your time to resolution and gets you back to your real job. Flow Designer includes a canvas, where you drag and arrange the elements of your workflows, and a pallet of tools including integrations, event triggers, and responses.
Zendesk Alerts packaged workflow: Setting the stage
Out of the box, the Zendesk Alerts packaged workflow provides three flow canvases that manage three key interactions between Zendesk and xMatters – Notify Group, Notify Assignee, and Terminate Events. You can use these flows to create and terminate events and send notifications related to Zendesk tickets. When you set up the workflow, you can configure the trigger rules in Zendesk to send ticket details to xMatters and find the correct assignee to resolve the issue faster using our on-call and shift scheduling.
When an xMatters user receives the notification, they can take action right away – taking ownership or resolving the ticket in Zendesk with a single click…or tap on the device of their choice. xMatters also keeps the ticket updated along the way, letting other Zendesk agents know when the event in xMatters was created, updated, or escalated. The screenshots below from the iOS app (also available for Android) show you some of the detail and response options:
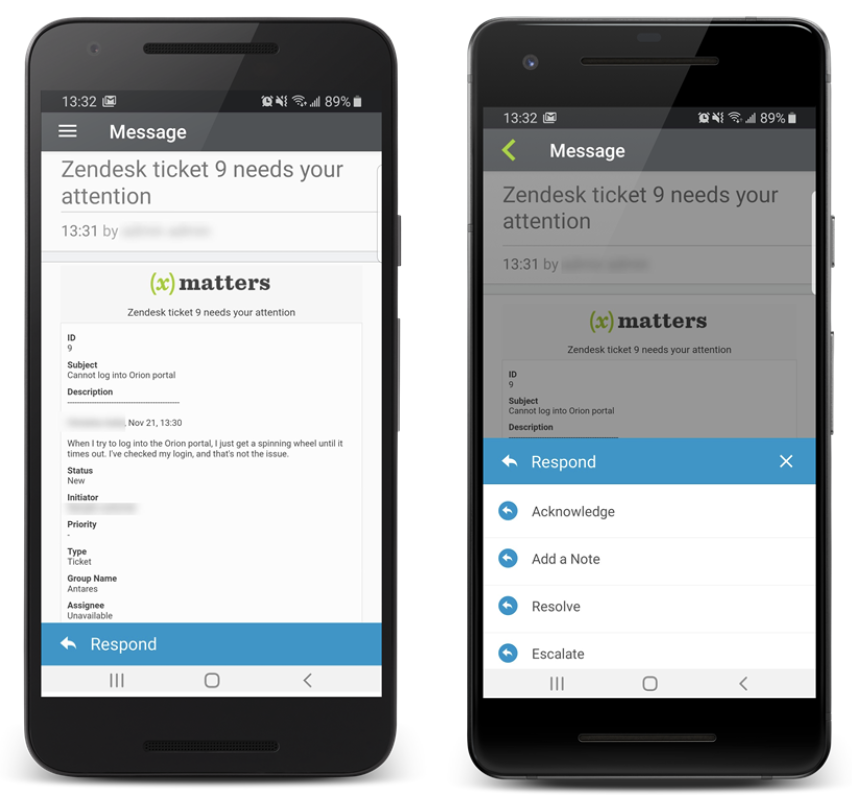
Zendesk packaged workflow at iOS
That’s out of the box, which is all good. But the great thing about Flow Designer is that you can tailor the flows to suit your needs, like expanding the Zendesk Alerts workflow to do the things you do manually today. One common change is to add Slack to your flows and automatically spin up a channel where you can collaborate on tough tickets.
Follow along with the changes or set up your own Zendesk Alerts workflow
Collaborate to solve things faster
While many tickets can be handled by an individual, sometimes you need a little help from your friends. More and more, DevOps and service management teams realize the value of bringing team members together to collaborate early and often when resolving issues, especially using chat applications like Slack or Microsoft Teams.
One of the simplest ways to extend a packaged workflow and improve collaboration is to add new response options and drag in some of our built-in app steps into the Flow Designer canvas. In this case, let’s take a deeper dive into the Notify Group canvas. The Notify Group piece of the workflow sends a notification to the xMatters group that matches the assignment group in Zendesk – it’s a great way to use your xMatters on-call management to find the right person fast. The flow comes with some baked-in responses that the on-call user in the group can choose from.
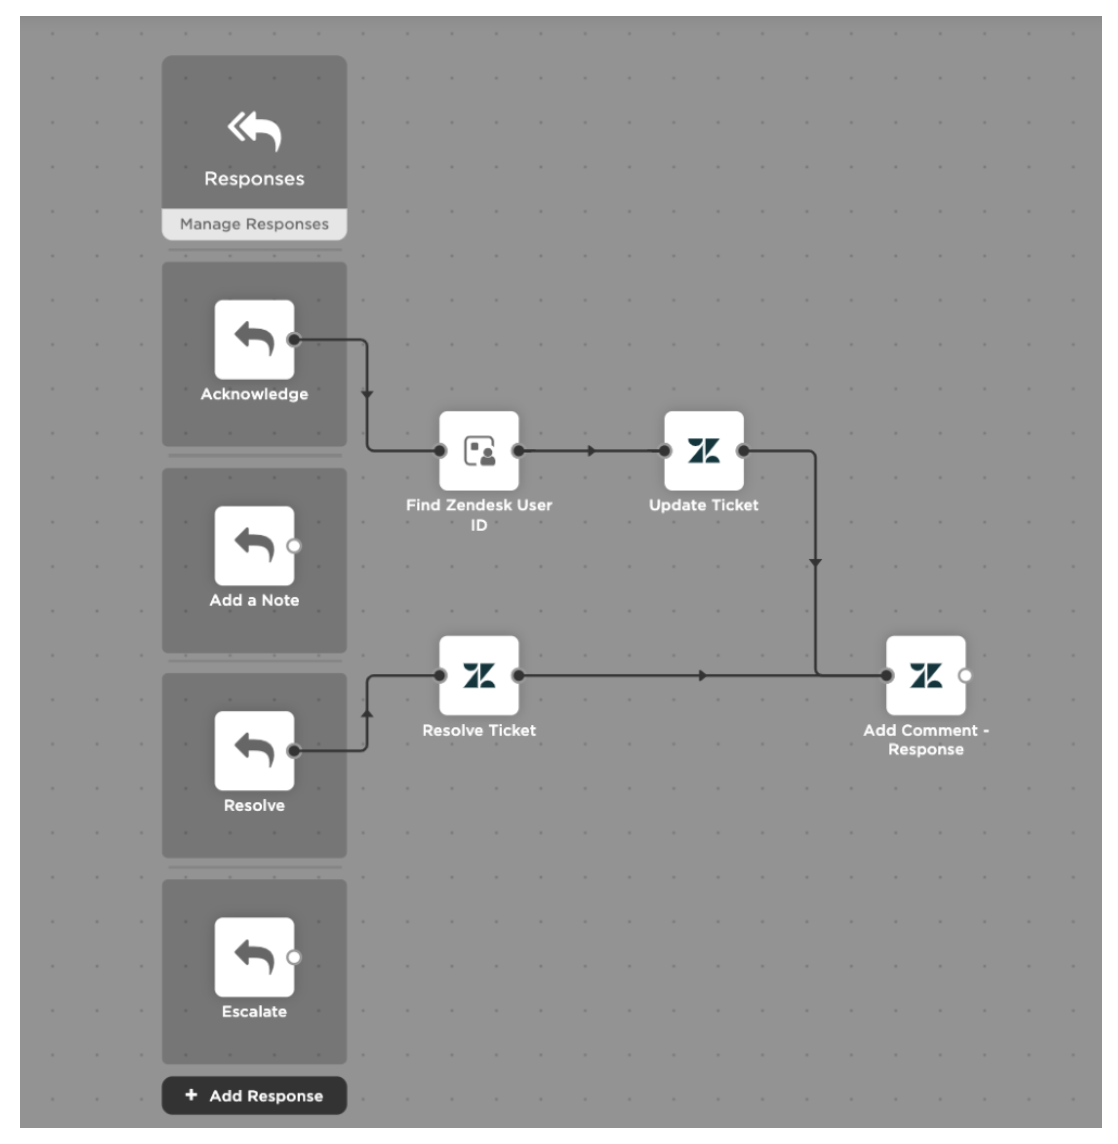
The Zendesk packaged workflow comes with some baked-in responses that the on-call user can choose from.
Let’s add a new “Collaborate” response option to the workflow by opening the Responses trigger from the pallet and creating a new response. The screenshot below shows the new response once all the details are filled (for more info on all the response settings, check out our online help).

Let’s add a new “Collaborate” response option
Once we save, the new response option shows up and you’re able to attach flow steps to it. In this case, we’re going to drag in the Slack Create Channel step to create a dedicated place to collaborate. Here’s one way to get this configured:
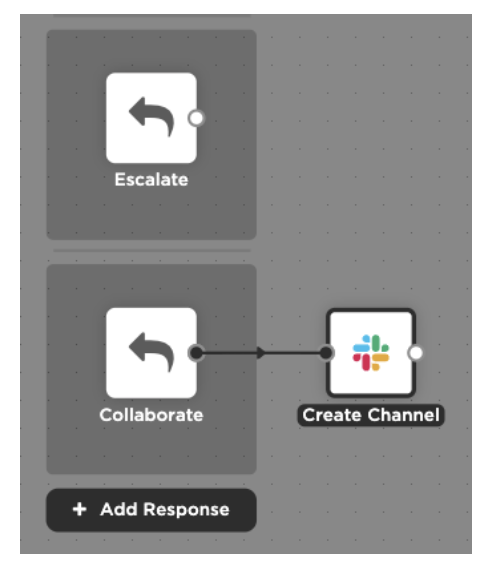
Drag in the Slack Create Channel step to create a place to collaborate.
Don’t forget to configure your endpoints – we need to know where to send the request. For full details on the Slack steps, check out our comprehensive guide.
Bonus: I’m butting into your flow to add the new Slack Invite Users step (shown below), which automatically adds the user that requested the channel to the channel. This is actually a sneak peek at a feature that will be making its way into production for our Indy release (scheduled for July 2020), but if you want something now, check out xMatters Labs for a custom step you can use today.

adding the Slack Invite Users step
Next, you’ll add a Post to Channel step that will automatically post the details of the Zendesk ticket to the dedicated Slack channel:
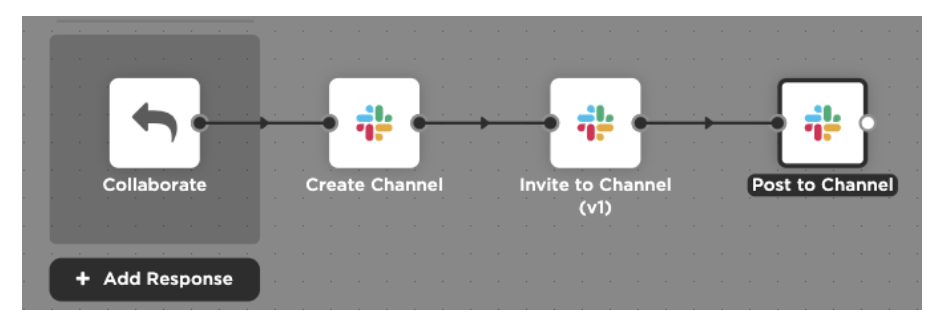
Post the details of the Zendesk ticket to the dedicated Slack channel.
To finish our flow, let’s add a comment in Zendesk with a link to our new channel:

Add a comment in Zendesk with a link to our new channel.
After we save, why not trigger a test event and try the response out? You’ll end up with a channel that looks something like this:

Trigger a test event and try the response.
And a handy link back to it in the originating Zendesk ticket:

Add a link to the Zendesk ticket.
Next Level: Working on a critical issue and need another team’s attention? Try adding the xMatters Bot for Slack and invite additional teams to collaborate in Slack using your xMatters on-call configurations.
Keeping the team informed
Sometimes you just want to let the team know what’s going on in case someone’s seen something similar—it may be recently or sometime a long time ago in a galaxy far far away. Why not give them a chance to speak up and get involved by posting a brief message in a common Slack channel you all call home?
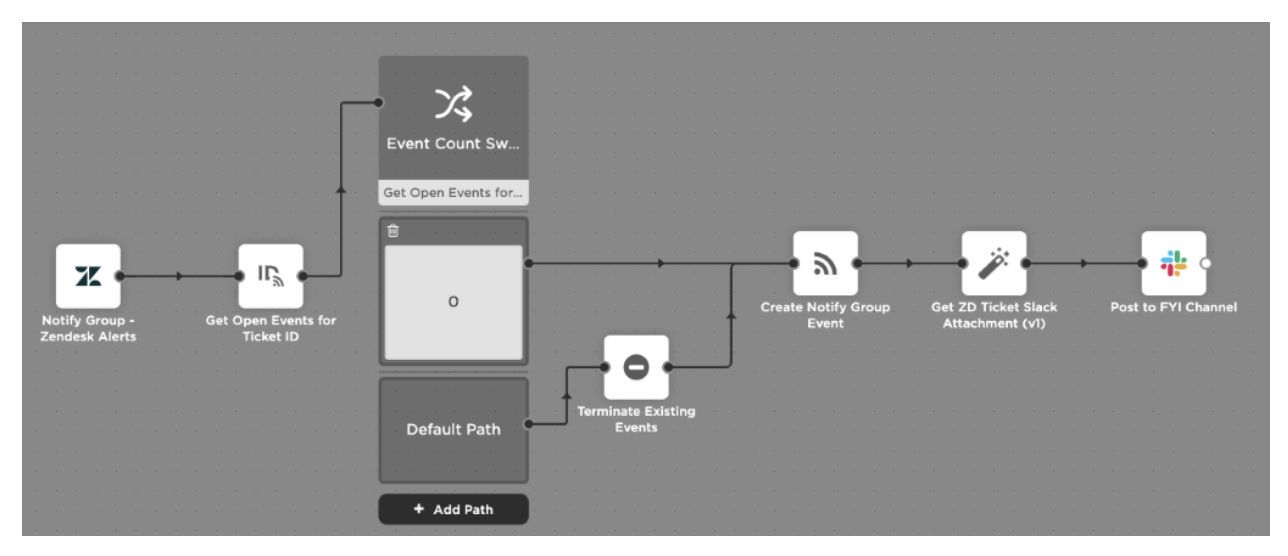
Let’s focus on our Notify Group canvas again, but this time we’ll add steps to the initial Zendesk Trigger flow which creates our new xMatters event. Whenever we see a ticket with a Priority x or higher, we want to automatically post to our #webui-service channel where other team members who have some cycles can see what’s happening and work with their teammates.
All we need to do is drag one of our Slack Post to Channel steps into this flow. You can reuse the Slack endpoint you created for our Create Channel example above to simplify configuration.
Keep team members informed with the Zendesk Alerts packaged workflow.
BTW, if you want to get really fancy, create a Custom Step and generate a Slack Attachment with more Zendesk details to make your messages extra readable. Using the standard message input will allow you to use Slack’s markdown for things like formatting, links and emojis, but you can’t create tabular structures or embed images directly. The Post to Channel step allows you to specify the messages’ attachment JSON, so you’ll usually need to generate that with some type of custom step. In my example, I’ve created an attachment that includes a link, the ticket summary and two key-value pairs with the type and status of my ticket. You could extend this to include images and colors to highlight important details quickly.
If we trigger our updated flow, here’s an example of what our #webui-service channel might look like:

Our Web UI Service channel might look like this.
Next Level: Keep the #webui-service channel up to date using a thread by saving the Slack message timestamp in a new event property. When critical event updates take place, like responses or event termination, you can use the Post to Channel step’s timestamp input to reply to your original Flow Designer message and keep the channel up to date without creating noise in the channel. Keep in mind that in order to save the timestamp you may need to move the Post to Chanel step upstream from the Create Notify Group Event step.
Next Steps
With Flow Designer, your integrations can grow with your team and your processes. There are lots of other ways to continue building up your Zendesk Alerts packaged workflow. Want to provide extra context to your resolvers before they’ve even logged into Zendesk? Pull in recent deployment or source code changes with a Jenkins or Github step before creating your xMatters event and include that info in the initial notification.
Over time, you might find a certain subset of events always require a Slack channel. Just move that into the original event creation flow so it’s created every time, and include the link to it in the initial xMatters notification.
Slack not your chat app of choice? No problem! We’ve got similar steps for Microsoft Teams in xMatters Labs, and you can expect to see an update expanding the built-in Microsoft Teams steps in Flow Designer in the Indy release timeframe.
If you’ve got some cool Flow Designer examples – or other workflow and process automation examples – we’d love to see them! Join our community or create a pull request for our xMatters Labs github repository.