Behold the Integration Builder
Categories
DevOps & SRE
Slack is quickly becoming a force in enterprise messaging and they happen to have excellent integration capabilities and they give free trial instances!
Note: This is more of a dissection of a script rather than a “how to build a script from scratch.” Check out our integrations platform page and our integrations page for officially-built integrations.
Let’s review! Slack can send a payload that looks like this (from the Slack Outgoing Webhook page):
token=XXXXXXXXXXXXXXXXXX&team_id=T0001&team_domain=example&channel_id=C21
But xMatters expects something like this:
{
“properties“: {
“Building“:[“Building A“, “Building B“],
“City“:”Victoria“,
“State“:”BC“,
“Street Number”: 2453,
“Is PO Box?“: true,
“Disaster Category“:[“Mass Movement“, “Earthquake“]
},
“recipients“:
[
{
“targetName“: “bsmith”
“devices“: [“Email“, “Voice Phone“]
}
]
}
So, how are we going to get a square peg into a round hole? We used Zapier in our last post, but this time we’re going to use the Integration Builder!
Once you log into your system, cruise over to the Developer Tab and you’ll notice there is a new entry in the Edit drop-down menu for the Integration Builder:
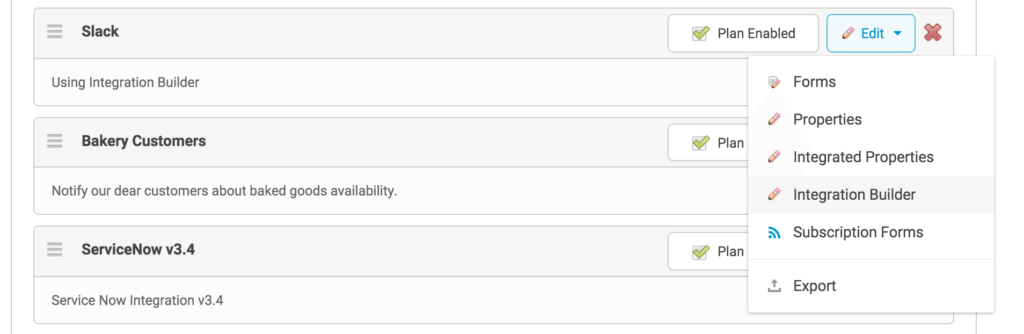
Developer tab for the Integration Builder
Clicking on this option will display a new page with the integrations you’ve already built for this communication plan. (Check out the Integration Builder help for handy reference items. I’m going to focus on just the elements we need here.)
Click the + Add next to the inbound integrations. On the New Inbound Integraton page, choose an action to create an event, then choose a form. This will display the script editor where our transformation script will reside. Give it a name and click Add Inbound Integration.
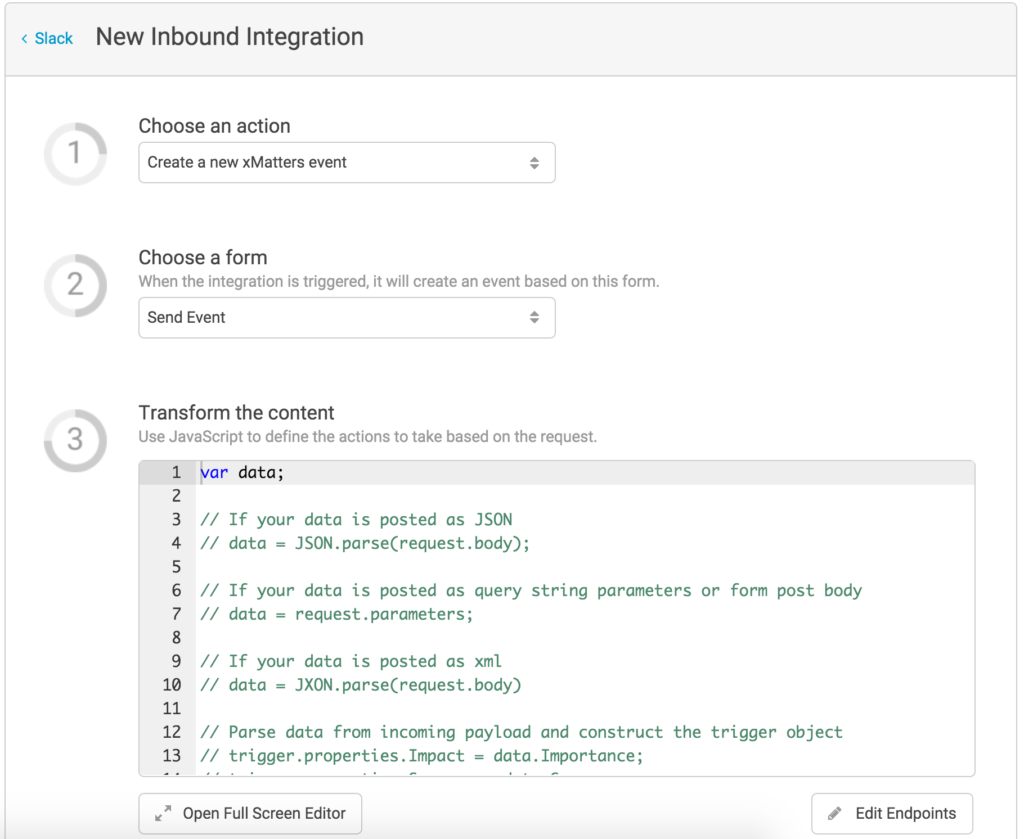
New Inbound Integration
Next, let’s jump back into the integration and set up the script. Using the full screen editor makes everything easier to work with. Paste in the following code. I’ll explain each bit below.
// Slack inbound
// Set up the xMatters endpoint for creating the event

// The credentials for authenticating to xM will be stored

// in the endpoint.
/////// ___________ 1 ___________ /////// // Replace the &s with ",", then the =s with ": " and throw in some {}s, and it's JSON. data = JSON.parse( '{"' + request.body.replace( /&/g, '", "' ).replace( /=/g, '": "' ) + '"}' );
// The text is coming over with +s instead of spaces, so we replace those data.text = decodeURI( data.text ).replace( /\+/g, ‘ ‘ );
/////// ___________ 2 ___________ ///////
// Now split out the recipients, which should be enclosed in “s and the message which is the rest
re = new RegExp( /“(.*)” (.*)/ ); match = re.exec( data.text );
// If there is no match, we can’t correctly
// parse the recipients and the message…
// So we’ll post it back to Slack.
if( match === null ) {
var msg = ‘Error sending event: Could not parse “‘ + data.text + ‘”. Expected: “[all | ]“ [message]‘;
console.log( msg );
return;
}
// If match has stuff, then we were able to split the message into
// two parts, one with the recipients (comma delimited), the other
// has the message the user wanted to send.
tempRecipients = [];
msg = “”;
if( match.length > 1 ) {
tempRecipients = match[1].split( ‘,‘ );
msg = match[2];
}
/////// ___________ 3 ___________ ///////
// The properties holds the tokens for the event.
trigger.properties = data;
trigger.properties.message = msg;
// Loop through our split up recipients and trim whitespace
var recipients = [];
for( var i in tempRecipients ) {
recipients.push( {
“targetName“: tempRecipients[i].trim()
});
}
// Add our recipients array to the payload container.
trigger.recipients = recipients;
// Logging the payload makes debugging way easier.
console.log( ‘trigger: ‘ + JSON.stringify( trigger ) );
// This is actually optional. The req.write function below
// will stringify the payload before sending over to the trigger API.
//var postData = JSON.stringify( trigger );
form.post( trigger );
This is a little daunting at first, but is actually rather simple when you break it down. This script does 3 things:
- Parse the incoming Slack payload into JSON.
- Extract the recipient and message.
- Build the xMatters event payload and create the event.
Let’s pull out the relevant pieces and inspect in a little more detail.
Parse the incoming Slack payload into JSON
The first thing we need to do is dig through the payload Slack sent over. The request object contains all the items we’d need to reference. For our purposes here, the important parts are these lines:
data = JSON.parse( '{"' + request.body.replace( /&/g, '", "' ).replace( /=/g, '": "' ) + '"}' ); data.text = decodeURI( data.text ).replace( /\+/g, ' ' );
These two lines do a series of replacements. If you take this Slack payload:
token=XXXXXXXXXXXXXXXXXX&team_id=T0001&team_domain=example&channel_id=C2147483705&channel_
name=test×tamp=1355517523.000005&user_id=U2147483697&user_name=Steve&text=googlebot: What is the air-speed velocity of an unladen swallow?&trigger_word=googlebot:
And replace the &s with ", " (that is double_quote comma space double_quote), and the =s with ": " (double_quote colon space double_quote) you get this mess:
token": "XXXXXXXXXXXXXXXXXX", "team_id": "T0001", "team_domain": "example", "channel_id": "C2147483705", "channel_name": "test", "timestamp": "1355517523.000005", "user_id": "U2147483697", "user_name": "Steve", "text": "googlebot: What is the air-speed velocity of an unladen swallow?", "trigger_word": "googlebot:
Which is pretty darn close to JSON format of "name": "value". Since the replace didn’t get the first and last "s, we’ll throw those in and wrap the whole thing in { and}, then parse the whole thing as JSON. And we did all that in just one line! The second line just cleans up some of the URI encoding that is necessary for Slack to send the payload out and finally, they encode the (spaces) with +s, so we do one last replace there. The upshot of these two lines, is that now we can reference the name value pairs as elements of a JavaScript Object. If we wanted to get the text value, all we have to do is:
var myTextValue = data.text;
There are actually many different ways you can do this transformation, and the above is probably not the simplest or easiest. If you find something better throw it in the comments!
Extract the recipient and message
The next few lines apply a Regular Expression to the data.text to parse out the recipients and message. Since Slack only deals with one “message” at a time, we have to encode the recipient and the message in the same text. We do that by defining the recipients as the first part of the message enclosed in "s and everything after that is considered the message. For example:
"tdepuy,Database" This is where my message goes
The regular expression, "(.*)" (.*) looks for stuff enclosed in "s, then a space, then everything else and stores them in the resulting array we call match:
re = new RegExp( /"(.*)" (.*)/ ); match = re.exec( data.text );
The if( match === null ) just makes sure the text is in the format we are expecting and will reject anything that is not in the "recipients" message format. It prints a helpful message to the log then exits the script.
if( match === null ) { console.log( 'ERROR: Could not parse "' + data.text + '". Expected: "[all | ]" [message]' ); return; }
One improvement we can make is to send a message back to the user stored in data.user_name and let them know their message was not in the right format. Sounds like a future post!
The next few lines deal with the situation where someone wants to notify multiple users. So they could do multiple groups by separating them with commas. For example to let the Database and Network teams know there is an outage on server005, a user could write:
"Database,Network" Outage on server005
These lines of code will split the recipients on the comma and put them into an array called tempRecipientsand then will set the msg to the rest of the text.
tempRecipients = [];

msg = "";

if( match.length > 1 ) {

     tempRecipients = match[1].split( ',' );

     msg = match[2];

}
Build the xMatters event payload and create the event
The last section builds the payload and creates an event. Again, we’ll use JSON, mostly because xM expects a JSON formatted string for creating events using the POST Trigger REST API, but it is also easy to work with. First we create the payload and then pass along all the name value pairs we got from Slack and add in our msg parsed out.
trigger.properties = data;trigger.properties.message = msg;
The next few lines we pull out the entries in tempRecipients and build out the recipients array. Since xMatters can accept a couple other things for a recipient, namely a device name to limit to, the API expects this an array of objects, with targetName being the actual target. So we iterate over tempRecipients and build out this array. Then tack it onto the payload:
var recipients = [];

for( var i in tempRecipients ) {

recipients.push( {

        "targetName": tempRecipients[i].trim()

     });
}
trigger.recipients = recipients;
Finally, with the payload built, we build out the rest of the headers and metadata for the event, and post to xM. The last two lines parse out the response and print the event ID to the log:
form.post( trigger );