An Introduction to Using Devcontainers for Local Development

Does this sound familiar?
“Well, it works on my machine!”
“Great— then we’ll ship your machine.”
We’ve all been part of that conversation (if you haven’t yet, I guarantee you will).
Indeed, it’s a common issue when development—and sometimes testing—is local to a developers’ personal machine. The code may work fine locally but the production environment can often be sufficiently different to cause code failures.
From my experience, a major cause of this is a local development environment that doesn’t line up with your production environment. Local dev environments can be finicky things, especially if you’re working on multiple projects at the same time, or potentially managing multiple versions of Node, Java, and Python. While tools like npm and Pipenv do a good job of managing package dependencies, there are still issues with OS-level library dependencies that can come into play, not to mention issues that crop up when you’re dealing with different operating systems.
So how can we keep dependencies nice and tidy while making packaged code easier to share? And how can we have the confidence that our dev environment mirrors production? All these inquiries have inspired the use of devcontainers for local development.
How Devcontainers Can Make Your Life Easier
While we’re all aware of how well devcontainers help us deploy the same object to our test/stage/production environments with no differences at the software level, not everyone realizes that we can also employ containers at the local development level. There will still be some differences because local dev environments can require compilers or debug tools that should not be included in production—but the base container, OS, and support libraries can now be brought into sync.
What does this mean for me as a developer? It means I can run my code from an integrated development environment (IDE) and it will execute and run debug operations against it inside the devcontainer, regardless of what my local dev environment looks like. And, every developer who works on the same project is guaranteed to be working in an identical environment that mimics the production environment.
While more and more of the numerous available IDEs now support devcontainers, I’m going to focus this on my IDE of choice: VS Code. Since I do most of my day-to-day work in Python, I’m going to use a basic Python Django project to demonstrate how you can start using containers for development.
Getting Started
Local Setup
Whether you’re on Windows, Linux, or OS X/macOS, your local workstation will need two things: Visual Studio Code and Docker. The container the IDE uses will also need to have all of the compilation dependencies and debug tools installed. But that’s it!
Project Setup/Updates
The following procedures work for both new projects and for adding devcontainer support to existing projects. This setup should be checked into your code repository with your project; this allows every developer to use the same setup and also means that you only need to run the procedures below once per project. With everyone on the team developing in an identical environment, setup time for new employees and teammates should be reduced.
To set up your environment:
- Open your project in VS Code.
- Click the Extensions icon in the Activity bar on the left side of the VS Code window, and search for “ms-vscode-remote.remote-containers”.
- When you find the Remote Containers extension, click Install.

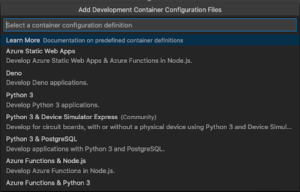
- Return to your source code, press F1 to open the search window, and then find and select Remote-Containers: Add Development Container Configuration Files.

- Select the template that best suits your project. (For this example, we’ll just be using Python 3 and, on the next page, Python 3.8; not all Google services consider Python 3.9 stable at the time of writing.)
What did that just do?
Glad you asked! At this point you should notice a new folder and two new files have been added to your project:
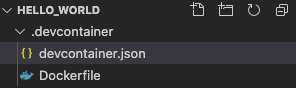
Dockerfile
This a standard Dockerfile that VS Code will compile and use. If the production form of your code runs in a container, I recommend that you use a single Dockerfile to handle both local development and the production release.
Since my code will run from inside a container, I’ll move this Dockerfile to the root of the project and remove the one in .devcontainer/. The Dockerfile can live anywhere inside your project; you simply have to adjust a few key values in the .devcontainer/Devcontainer.json file, and we’ll get into that file in the next section.
Here’s what my <PROJECT_ROOT>/Dockerfile looks like:
ARG VARIANT="3.8"

FROM python:${VARIANT}-slim as builder

COPY Pipfile* ./

RUN pip install -U pip \
&& pip install pipenv \
&& pipenv lock --requirements > /tmp/requirements.txt \
&& pipenv lock --dev --requirements > /tmp/requirements-dev.txt

FROM python:${VARIANT}-slim

ARG BUILD_ENV="prd"

COPY --from=builder /tmp/requirements.txt /tmp/
# this file is copied only, it is not installed via the
# container build so that these libraries don’t end up in prd
COPY --from=builder /tmp/requirements-dev.txt /tmp/

# git is used by VSCode
RUN pip --no-cache-dir install -U pip \
&& pip --disable-pip-version-check --no-cache-dir install -r /tmp/requirements.txt

EXPOSE 8000
This Dockerfile does the following:
- Installs Pipenv into an interim Docker container and builds requirements files for use in the main container.
- Copies the requirements files into the main container.
- Installs the requirements files.
The rest of the file is pretty straightforward, but I should note that this builder method is another of my personal preferences to keep image sizes down by not having Pipenv in production. It also feels wrong to me to run Python in a virtual environment in a container. Isn’t that what the container is for?
“But wait! What about that requirements-dev.txt file?”, you ask. We don’t install the dev requirements just yet because we want to keep as many as possible out of the Dockerfile. This helps avoid accidental deployment of dev requirements into production. We’ll get to that file in the next section using “postCreateCommand”.
Devcontainer.json
The devcontainer.json file contains the VS Code configuration for Docker build options and args, and the container runtime options, including the ports to open, environment variables, and mount points to mount local files into your container. It also contains the VS Code extensions to install, and guidance about how to configure those extensions. Here’s what my version looks like:
{
   {
"name": "Python 3",
"build": {
"dockerfile": "../Dockerfile",
"context": "..",
"args": {
"VARIANT": "3.8",
"BUILD_ENV": "localdev"
}
},
"containerEnv": {
"SECRET_KEY": "really_bad_secret_key",
"DEBUG": "True"
},
// Add the IDs of extensions you want installed when the container is created.
"extensions": [
"ms-azuretools.vscode-docker",
"ms-python.python"
],
// Use 'forwardPorts' to make a list of ports inside the container available locally.
"forwardPorts": [8000],
// Set *default* container specific settings.json values on container create.
"settings": {
"terminal.integrated.shell.linux": "/bin/bash",
"python.pythonPath": "/usr/local/bin/python",
"python.formatting.autopep8Enabled": true,
"python.formatting.autopep8Path": "/usr/local/bin/autopep8",
"python.formatting.blackEnabled": true,
"python.formatting.blackPath": "/usr/local/bin/black",
"python.linting.enabled": true,
"python.linting.pylintEnabled": true,
"python.linting.pylintPath": "/usr/local/bin/pylint",
"python.linting.pydocstyleEnabled": true,
"python.linting.pydocstylePath": "/usr/local/bin/pydocstyle",
"python.linting.flake8Enabled": true,
"python.linting.flake8Path": "/usr/local/bin/autopep8",
"python.linting.pycodestyleEnabled": true,
"python.linting.pycodestylePath": "/usr/local/bin/flake8",
"python.linting.pylintArgs": [
"--load-plugins",
"pylint_django"
],
"python.linting.pycodestyleArgs": ["--ignore=E501"], // E501 is line to long
"[python]": {
"editor.codeActionsOnSave": {
"source.organizeImports": true
}
}
},
"mounts": [
"source=${localWorkspaceFolder}/secrets/,target=/etc/secrets/,type=bind,consistency=cached"
],
"remoteUser": "root",
"postCreateCommand": "apt-get update && apt-get install -y git && pip --disable-pip-version-check --no-cache-dir install -r /tmp/requirements-dev.txt",
}
To break it down:
- The build section contains the location of the Dockerfile, where the context of the Dockerfile will use as a root folder for relative paths as well as the standard docker build args. I’ve moved my Dockerfile to be in the root of the project, so I have “dockerfile” set to “../Dockerfile” and “context” set to “..”.
- The containerEnv section sets the container environment variables inside the container once it starts, and extensions are the VS Code extensions to install into the container post creation.
- The settings section sets the configuration values for VS Code and any installed extensions.
- mounts are the standard Docker mount arguments, with ${localWorkspaceFolder} being a shortcut to the root of this project.
- The remoteUser setting will override the last USER issued in the Dockerfile, so you can have production run as an unprivileged account but still run as root in the container. For the most part, aside from testing new system libraries and modules, this should not be required as your code should run just fine as an unprivileged user.
- Finally, postCreateCommand is a single line of bash containing any extra commands to run on startup of your container. In this example, I’m installing Git and my Python dev requirements: linters, debuggers, mocking tools, and so on.
Once these files are in place, you can hit F1 and run “Remote-Containers: Rebuild Container”—you’ll see it start building the container. Behind the scenes, Docker will manage the image and run the container. Spin up times will be faster after this initial launch because whenever you reopen the project, it will reuse the container.
A Bit More Magic
Once the devcontainer is built and running, VS Code performs a couple more magic tricks that require no configuration on your part. The first is that when VS Code launches your container it will override your ENTRYPOINT with a generic sleep type call to keep the container running until the sleep is canceled (when you close VS Code). The second is that it will mount the root of your project into the container and set that directory as your WORKSPACE (the default location for this mount is /workspaces/<your project folder name>/).
Time to Play
Once all this is configured for your project, you can commit it into your code repository alongside your code. Now, any time another developer checks out this code and opens it with VS Code you are guaranteed to get the same developer environment, and that environment will be a much closer representation of production.
This makes life easier for onboarding new engineers, replicating bugs, and reducing the likelihood of bugs. As a bonus, it also gives you a nice way to try something new and experimental; you can completely corrupt your dev environment and still be able to recover it easily simply by rebuilding the devcontainer. There’s no need to worry about breaking other projects you are working on—and no need to ship out your machine.